Page 1 / 7
Design &
Construction |
  |
|
Since the Project MAME I have wanted to
build a micro MAME cabinet in acrylic sheets. But the process of
designing all the small pieces with such precision has kept me
from trying. At least till now :) My inspiration for the cabinet
was actually from my childhood "arcade cabinet" from Nintendo.
The Table Top Donkey Kong Jr.
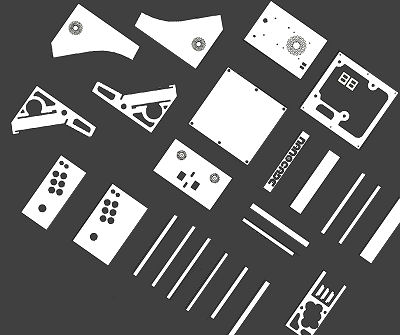
The parts on the first picture is not the final design.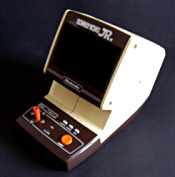
I would like to thank Andy at Ultimarc.com for sponsoring some of the parts
for this project. I'm sorry that you have decided to stop
supporting my future projects:

|
|
 |
I
used about 50-60 hours on designing these 29 pieces of acrylic.
The cabinet is designed to be small enough to sit comfortably in
you lab while playing. This makes it possibly to play in your
bed or on your couch. So this is really more of a laptop than a
bartop :D
I constantly had to redesign most parts,
because I went from a 8,4 inch monitor to a 10,4 inch monitor.
And when I finally received the monitor, It was larger than the
specifications on their website. The cabinet will easily fit any
10.1 inch widescreen netbook monitor. It's actually perfect for
using with netbooks.
But finally the design was finished and I
sent the drawings to a workshop with a laser cutter.
Unfortunately the laser cutter was for metal, so I had to loose
some fine details. |
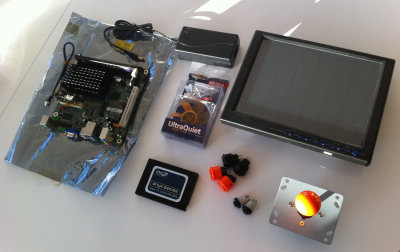 |
Here is the internal parts I have
chosen: 1 x
Lilliput 10.4" LCD monitor
1 x Ultimarc UltraStik 360 joystick
(UltraStik has build-in encoder)
3 x 24mm orange Sanwa pushbuttons
3 x 24mm black Seimitsu pushbuttons
3 x 10mm pushbuttons
Mini-ITX board - Intel D510MO
1 GB DDR-2 memory
30 GB SSD - OCZ Onyx
PicoPSU
80 mm FAN - Akasa UltraQuiet Amber |
 |
I received the acrylic parts, but
unfortunately the cabinet sides had a mistake and I didn't have
any more orange acrylic sheet. So I had two new sides made in
black acrylics. Hope it will look good in black too. Some
details is left out because my parts are cut on a industrial
metal laser cutter, and it is just too power full to cut fine
detail in acrylics. Good enough for a prototype.
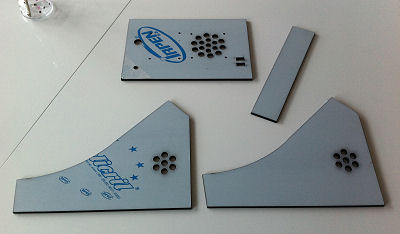
All parts are made of coloured
black or orange 5 mm Plexiglas / acrylic sheets except the
monitor cover which is 3 mm transparent. |
 |
I have made two control panels in acrylic. One for
heat-bending and one for gluing together. I wasn't sure if I
really could get a good result of heat bending it, so I had the
other one made too, just in case.
Both looks really good, but the one glued together is much more
precise and has kept the original measures perfectly.
I will decide witch one to use when the rest is assembled.
I'm leaning towards the heat-bend one... |
|
|
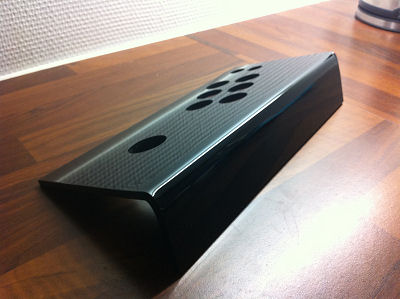 |
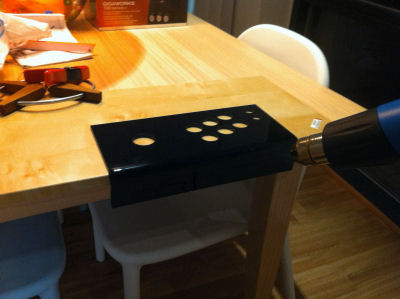
It is very hard to heat bend acrylics, but
it looks good. The sheet got a lot shorter though!
It looks easy on the picture, but I had
already finished it at this time, the heat gun is just to
illustrate. |
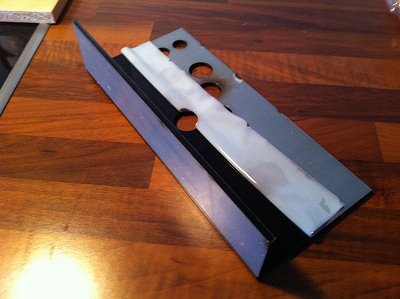 |
Here is the glued control panel. Much more
precise, but it doesn't have that nice feel.
I use an industrial adhesive
callad Evonik Acrifix 116 and 192, especially for acrylics.
Acrifix 116 is a fast curing
solution and it bonds in 90 sec when exposed to acrylics. It is
a thin solution and not very gap filling. Good for T-bonding.
Acrifix 192 cures when it is exposed to ultra violet light. Then
it transforms to being acrylic itself. Sunlight is just fine. I
use this for reinforcing and filling gaps.
You will find it at
http://plexiglas-shop.com/
if you cannot find it in your country. |
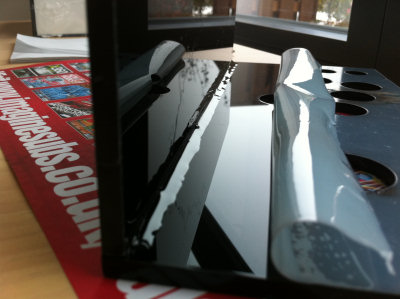 |
Here I have reinforced the inside
of the control panel with the 192 solution after bonding it with
the 116 solution.
I tried to brake this bond with
all the strength I had, and I couldn't do it. Now you probably
know I'm using the heat-bend control panel ;)
If you live in USA, Weld-On will probably have some similar or
better products for this type of work. Please don't make your
own solution with acrylic shreds and acetone, it's not nearly
strong enough. Use chloroform instead if you can get it.
|
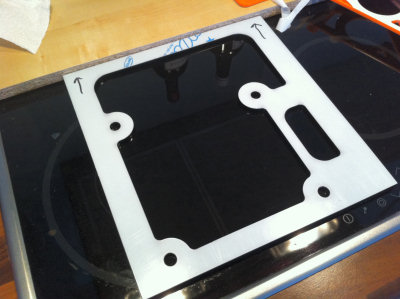 |
This is the bottom of the cabinet.
It's made of two sheets. The holes is for mounting the mini-ITX
mainboard.
It made of two sheets to cover
the screw heads. You'll see how later. |
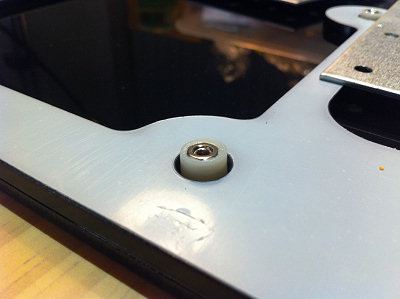 |
PCB mounting feet in the holes.
These are bonded with epoxy glue (Araldite) because the feet are
made of nylon and not acrylics.
Maybe I could just have glued on
some nuts instead, that would have been much cheaper.
|
Also check out:
Upgrading the Nanocade
(2013)
(9.7" iPad 2 screen, new
motherboard, speakers etc.) |
 Join
our Facebook group and receive updates and discuss MAME cabinets
with fellow retro gamers: Join
our Facebook group and receive updates and discuss MAME cabinets
with fellow retro gamers: |
|
Page 1 / 7 - Design &
Construction |
|
|
|
|
If you decide to make your own MAME cabinet using my drawings, please feel free to
make a donation, as I'm trying to raise enough money to make a new
up-right cabinet, that's hard to do as a student. |
|
