Page 1 / 1
Upgrading the Nanocade
(9.7" iPad 2 screen, new
motherboard, speakers, cables) |
  |
|
I finally decided to
upgrade the Nanocade with some new and improved parts.
I was never happy with the Lilliput 10.4"
monitor. I has very poor contrast, low resolution (800x600), low
brightness and the response time isn't to shabby either. The big
problem is that 4:3 monitors in that size are all crap and they
are all very expensive and even harder to find. In a few years
they are probably impossible to find.
Then I realised that the Apple iPad 2 has a
fantastic IPS screen in right 4:3 format with very good
brightness and pretty good contrast. The resolution is 1024x768
and that is a pretty big upgrade from 800x600 when you need to
upscale arcade games. I found a kit with a VGA/LVDS controller board
and a LED booster for the iPad 2 screen (LG/Philips IPS LP097X02
panel). The panel and the kit is $129 or $100 less than the
Lilliput monitor.
| |
Part |
List of new parts |
Old parts |
| |
Monitor/Panel:
Motherboard:
CPU:
CPU cooler:
RAM:
PSU:
Speakers:
|
9.7" iPAD 2 LCD (LG/Philips LP097X02, 1024x768)
+ LVDS to VGA controller (RTD2025L) + LED boost board
MSI H61I-E35 (B3)
Celeron G1610 (Ivy-Bridge, intel HD)
Akasa K25 low profile cooler
4GB DDR3-1333
Pico-PSU 80 + 96 watt external PSU
2x2" + USB 2x2.5 watt amplifier |
10.4" Lilliput FA1042-NC/P (800x600)
Intel D510-MO Mini-ITX
Intel Atom D510 Dual Core
Passive on-board cooler
1GB DDR2-800
Pico-PSU 80 + 60 watt external PSU
Build-in monitor FA1042 |
I also decided to add some much needed horse
power to the Nanocade. Above you can see a comparison table with
new and old parts.
The build-in speakers of the Lilliput was also
very weak and lacked the lower end totally. So I will upgrade
that to two 2" full-range speakers and a USB powered amplifier.
|
|
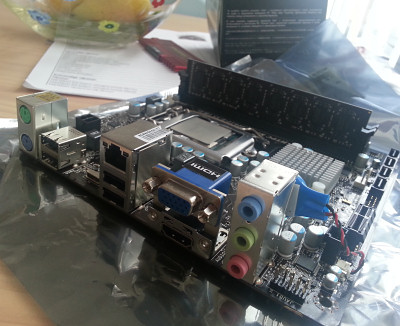 |
Going from a very compact Intel Atom system to an
Ivy Bridge LGA1155 system causes all sorts of problems. Mainly
due to cooling and size of components.
The VGA socket is raised because there is a HDMI socket beneath
it. The problem is that there isn't room for a standard VGA plug
due to the depth of the sanwa pushbuttons. There hardly were
room for it with the Atom board.
The only solution is to make a smaller VGA cable. |
 |
So I went ahead and ordered a D-SUB 15-pin male
soldering plug. I found a thin cheap VGA cable in the attic and
cut it in the right length.
It was absolutely horrible to solder this plug because of the
cheap VGA cable. Everything melted away as soon at it touched
the soldering iron. A word of advise, use a good quality cable
for this procedure.
Well it worked fine in the end. But it look like it will brake
apart very easily. |
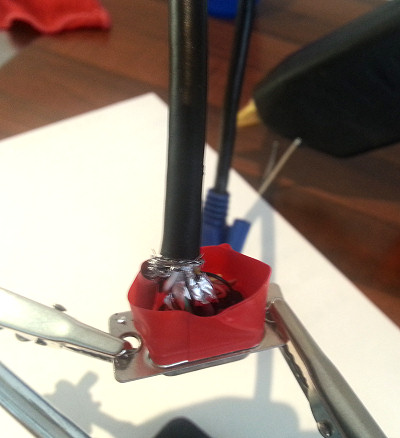 |
Using some isolation tape, I made a little
casting mould to make a plug around the wires with a hot glue
gun. I haven't done this before, so I didn't know it would work.
I made sure to really squeeze as much as possible down there to
fill every gap in there. I also made sure the glue was really
hot and thin before starting to fill it in. |
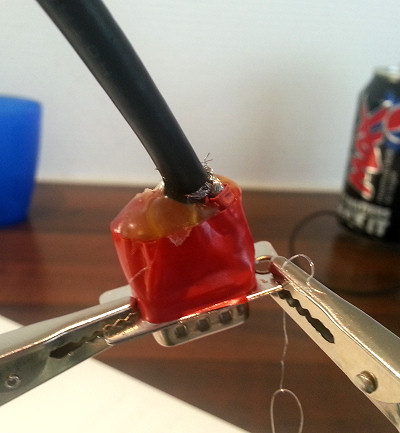 |
To my surprise this worked absolutely brilliantly and I only
burned myself a few times. None of the wires will break easily
and you even have something to grab hold of. |
|
|
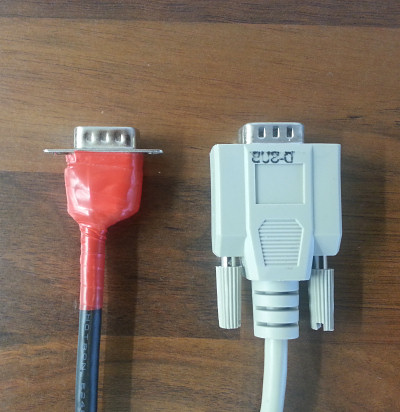 |
Comparison between the big old VGA plug and the new DIY hot glue
plug. The new plug takes up about 1/8 the size of the old plug.
And maybe 1/3 the size of the smallest VGA plugs available. |
|
|
Return in a few days for part 2... |
|
|
|
|
|
|
|
|
|
|
|
 Join
our Facebook group and receive updates and discuss MAME cabinets
with fellow retro gamers: Join
our Facebook group and receive updates and discuss MAME cabinets
with fellow retro gamers: |
|
Page 1 / 1 |
|
|
|
|
If you decide to make your own MAME cabinet using my drawings, please feel free to
make a donation, as I'm trying to raise enough money to make a new
up-right cabinet, that's hard to do as a student. |
|
