|
What is an encoder?
An encoder is a device translating the input from your arcade
controls to a language your PC or console would understand. Most
translate your control inputs to keyboard commands, but some
translates them to gamepad / joystick inputs. Today most
encoders is connected to a PC via the USB port. Some still uses
the older PS/2 interface.
You basically have
three options for connecting your controls to your PC:
1. Hack a keyboard
(difficulty: medium to hard)
The cheapest option. Most people have an old keyboard lying
around or you could buy a new keyboard for $10. This requires
you to open the keyboard and remove the internal encoder. This
will require that you are very familiar with modding electronics
and soldering. Here is a good guide for hacking a keyboard:
http://www.modd3d.com/articles/item/keyboard-hack
2. Hack a controller for PC or a
console (difficulty:medium to very hard)
This is great if you are using a Xbox 360 or a Playstation 3
for your arcade cabinet. Here is a sample on how to hack a Xbox
360 controller:
http://forum.arcadecontrols.com/index.php?topic=64050.0
3. Buy a dedicated encoder
(difficulty: Easy to very easy)
This is the easiest way and the most safe option. This is the
one I would recommend to everyone not too familiar with modding
electronics and soldering. These can often be connected to
spinners and trackballs too.
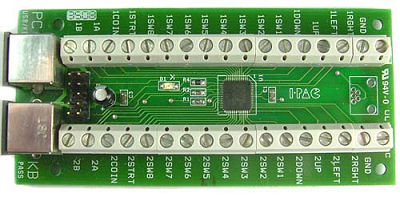
How do I connect the controls to
the dedicated encoder then?
This is actually much easier than most people think. You
only need to know some basic things. The encoder has a lot of
terminals for connecting your wires. Half of them is for Player
One and the other half is for Player Two. Now we have already
made it half as complicated :)
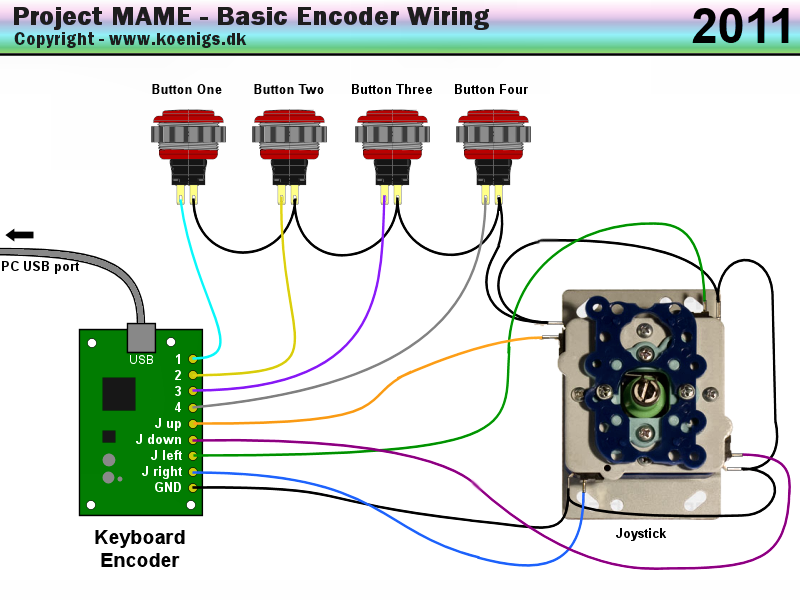
There's four terminals for a
joystick, one for each direction, up, down, left and right. The
rest of the terminals is for the push buttons. Sometimes there
is separate buttons for Start and Coin, but it doesn't really
matter how you hook them up because is depends on what function
you configure them to in MAME or other emulators / games anyway.
Here is a sample of an encoder, the
I-PAC from Ultimarc:
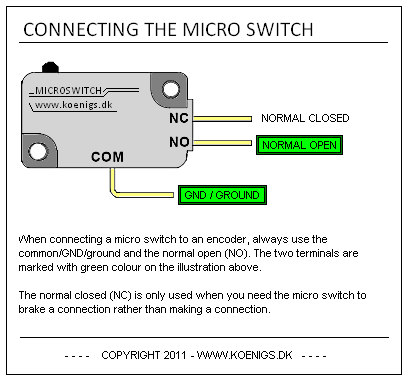
There is also a terminal called GND
or ground. There can be one for both player one and two, or just
one for sharing. The GND/ground is very important. This terminal
has to be connected to every push button and joystick switches.
You can just make what's called a daisy-chain, this is a wire
going from on push button to the next like a chain or the
lighting on a Christmas tree. I made this illustration for
making it easier to understand, because I know this GND / Ground
thing is what confuses most people and maybe ending up with
abandoning the project or, even worse, buying a X-arcade stick
:). Here goes:
|